How to enable Autosave feature in MS Excel ?

Author: Tom4u // Category: , ,
Microsoft Excel includes a powerful feature of saving your document automatically after some specified time intervals. By default, Excel automatically saves your current document after every ten minutes intervals but you can change this time. This Auto save feature save the data in the same file. However, AutoSave protects your data in the event that Excel unexpectedly quits. It is also good idea to create a backup of your files using any removable devices, because in this global network a computer can crash, a virus create problem, or a hard drive failure can wipe out everything.

Follow the given steps to change default save time and enable auto backup feature:


A small dialog box will open, here select the Save tab in the dialog box.
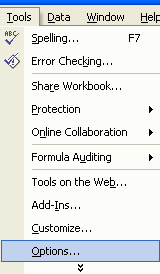


Now click the "Save AutoRecover info every" check box and enter the time in minutes under "Settings" area.


Here you have choice to modify the location of saving your document automatically under "AutoRecover save location" option.Click the Ok button of dialog box to finish the process.

source:computerfreetips.com

Views document with different styles in Word

Author: Tom4u // Category: , ,
You can display document in different views in document window. When you switch from one view to another, the document contents are not affected and only the layout of the document is changed. A Microsoft word document can be viewed in four different ways.

You can select a view form the View menu or by clicking their respective icons located at the leftmost section of the horizontal scroll bar. The document views are described below.

Normal View

In normal view, only the text and the text formatting is viewed. The headers &footers, graphics or layout of the page is not shown. This mode is used to type and edit text quickly.

Web Layout View

In Web layout view, the document is viewed on the screen as it would be appeared in the Web Browser. This mode is used if you want to create a Web page or document in MS Word and save it as Web page.

Print Layout View

In Print layout view, the document is viewed on the screen as it would be printed on the printer. The headers &footers, graphics etc. are also viewed in this mode. This view is useful for editing headers& footers, for adjusting margins, and drawing objects etc. This mode is very slow for creating and editing documents.

Outline ViewIn outline view, the structure of the document is displayed. The structure of document may include main headings or you can expand it to see all headings and even body of text. In this view, page boundaries, headers footers, graphics and background are not appeared. This view makes easy to work with master document. A master document is used to organize and maintain a long document, such as a multipart report or a book with chapters.

If you are face any kind of computer problem the go for Computer Repair
source:computerfreetips.com

Microsoft Office XP working with built in speech recognition features.

Author: Tom4u // Category: , , ,
Microsoft Office XP has working with built-in speech recognition features. The main purpose of this feature to understand the speech and then coverts to text file. You can run this feature in any Office XP applications, for example Microsoft Excel or Microsoft Word.

Follow the give steps to install the speech recognition features in office XP:

First click on Start button, go to Control Panel then click on Add or Remove Programs.

Now find and select the "Microsoft Office XP Professional with FrontPage" option in Add or Remove Programs list, then click on Change button.

Here select the option "Add or Remove Features" Change which features are installed or remove specific features", and click on Next button.

Here expand the "Office Shared Features"> Alternative User Input > Speech. Now click on Speech option and select "Run from My Computer" from menu and click on Update button to start installation process.

Now system will takes some time to install this feature.

After you have installed, open Microsoft Word > Tools > and click on Speech option.

Now click Next on welcome page.

If you are running it first time, then system will ask you for voice training, you can skip it but the voice training increase the chance of accuracy.

If the training is over, now try to speak "File" to open the File menu and check speech recognition feature has been working or not.

If you face any kind of problems with you computer then go for Computer Repair

source:computerfreetips

How to add Header/Footer in your PowerPoint presentation?

Author: Tom4u // Category: ,
In Microsoft Power Point, you can use the option "Header and Footer" to add the repeated information (for example reference note, data, time, slide number) in the main slides. This tip is very useful, when you want to add slide reference note on every slide in your presentation.

erform the given procedure to add header/footer in PowerPoint presentation:

From View menu select "Header and Footer" option, a small dialog box will appear with the title "Header and Footer".

Select "Slide" tab, now you can select "Fixed", "Date and time" option or select "Update automatically Date and time under "Include on slide" section.

To add the number, check the "Slide number" option, and to add footer, select "Footer "checkbox and type text that you want to appear as slide footer.

Click on Apply button to save "Slide" tab settings.

Under "Notes and Handouts" tab, you can select also "Header" with all "Date and time" and "Footer" options.

Once you have selected the all required options, click on "Apply to All" button to save all settings.

If you face any kind of problems with you computer then go for Computer Repair

How to perform automatic Saving & Backup of your Word file?

Author: Tom4u // Category: , ,
Microsoft Word also has an important feature of saving your work automatically into the current document after specified time. By default, word automatically saves your current document after every ten minutes but you can change this time. It is also good idea for you to create backup of your files automatically. Because in this global network a computer can crash, a virus problem, or a hard drive failure can wipe out everything.

Follow the given steps to change default save time and enable auto backup feature:

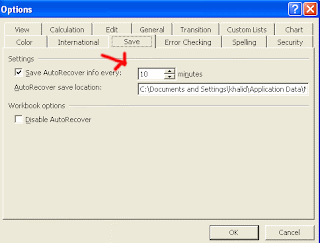
First choose Options command from Tools menu.
A small dialog box will open, here select the Save tab in the dialog box.
Check the option "Always create backup copy" to set your word to create backup copy of file each time, you save document. Word saves this backup copy in same folder as your original document with .wbk extension.
Now click the "Save AutoRecover info every" check box and enter the time in minutes.
Click the Ok button of dialog box to finish the process.

If you face any kind of problem in microsoft word then go for Microsoft Help.

Tips to add Picture into Header/Footer in Excel?

Author: Tom4u // Category: , , , , , ,

In MS excel header and footer option is used to display the repeated graphics or text on the top or button of each pages in a document. You can insert a picture (company logo or other related picture) in the bottom or top margin of each page. For reference, you can add the data, time and path for where you saved excel file on your computer or on any network server. Both the header and the footer are displayed in print layout view and save your time to enter the same items in pages again and again. You can use the same header and footer throughout a document or change the header and footer for part of the document.

You can leave the header or footer for the first page and can also use different headers and footers on odd and even pages or for part of a document.

To apply header or footer, follow these steps.

Select "Header and Footer" from View menu, "Header and Footer" Floating Toolbar will appear. The header and footer sections of document are also activated.

Now under Header/Footer tab, click on Custom Footer button then select left section.

To insert the picture, click on Picture icon (the 2nd icon from the right side) to select the company logo that you want to add.

Select other options if required, for example you can add date, time file name and file path also.

Now click Ok button to finish the process.

If you face any kind of problems with you computer then go for Computer Repair

How to packaging your PowerPoint presentation to CD?

Author: Tom4u // Category: ,
In Microsoft PowerPoint 2003, you can copy a presentation on to CD with all its supporting materials using "Package for CD" option. With this feature, you can merge the whole presentation components (pictures, music, charts, fonts and other graphics) as a single file so that you can run this presentation on another computer even if PowerPoint is not installed. This package file will useful for presentation backup and easy to transfer from one computer to other computer. In previous version of PowerPoint, the name of this feature was "Pack and Go".

Follow the given steps to create CD package for PowerPoint Slides:

1. First of all click on "Package for CD" option from the "File" menu, a small dialog box will appear with "Package for CD" title.

2. Now type the CD name in the "Name the CD" box.

3. Using same dialog box, click on "Add Files" button to add actual presentation file.

4. Click on "Options" button to explore more choices. Here you can include linked file, Embedded TrueType fonts and also set password so that unauthorized person can not display as well as modify your document.

5. Now if you are using windows 2000, click on "Copy to Folder" button to save this package on hard disk and then write it on CD. However if you are using windows XP, click on "Copy to CD" button and then your package will directly write to a blank CD.

6. After you have selected the necessary options, click on Ok button to transfer PowerPoint file and then close Package for CD dialog box to finish it.

If you face any kind of problems with you computer then go for Computer Repair

source:computerfreetips